Preface
You can find the finished code repository here.
Background
As remote work becomes the norm these days, getting to know your coworkers and maintaining a sense of community within a team/company is more challenging than ever. In fact, I experienced this struggle firsthand ever since the pandemic.
After brainstorming ways to help mitigate this, some coworkers and I came across the concept of watercooler chats. They are daily casual conversations through which team members can connect and bond over common interests or funny topics. These conversations were traditionally done, as the name suggests, during short breaks (e.g. when fetching water from your office's laggy water cooler :D).
But what if you could automate these chats online and make them more engaging + inclusive for the whole company?
The Idea
I wanted to create a special channel in my company's Slack application in which a watercooler question is asked by a custom bot every day. My colleagues all over the world could then answer the question (in their own free time) and even comment on other colleagues' answers as well!

I wanted full control over the list of questions asked and also wanted my colleagues to be able to add some of their own custom questions. Furthermore, I wanted this to be a super intuitive product such that any employee, regardless of his/her technical background or role, could contribute to this initiative. With this in mind, I decided to store the list of watercooler questions in a Google spreadsheet since most people should be familiar with it + it can be shared very easily. As such, any employee can add a fun question to the spreadsheet, and it will be picked up by the watercooler bot in the future.

Now, going under the hood, we want a pipeline that will enable us to:
Select a question from the Google spreadsheet
Post the selected question in a targeted Slack channel, along with an accompanying GIF attachment to spice it up.
Delete selected question from the spreadsheet so it won't be repeated in the future.
Automate all these steps under a pre-determined schedule (daily, three times a week, etc.)
Setup
Google Cloud Console
We need to utilize Google Sheets API to programmatically read & write online spreadsheets.
Create an account or log in at Google Cloud Console, then create a new project with any name and organization that you want.
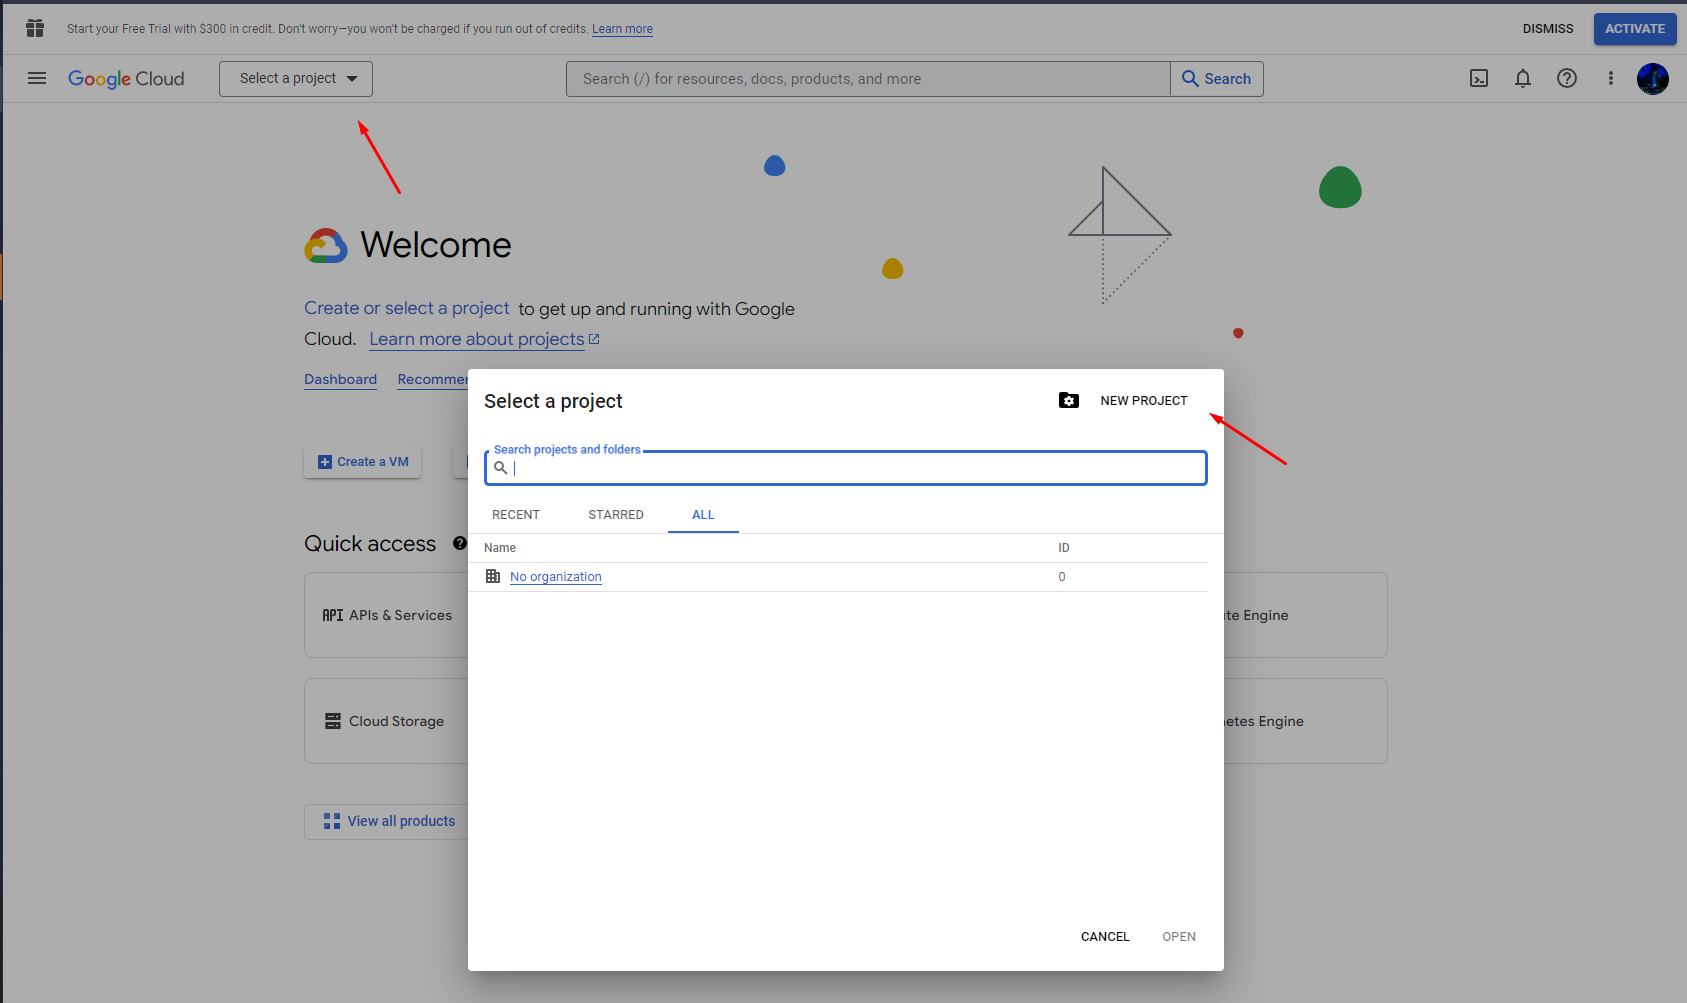
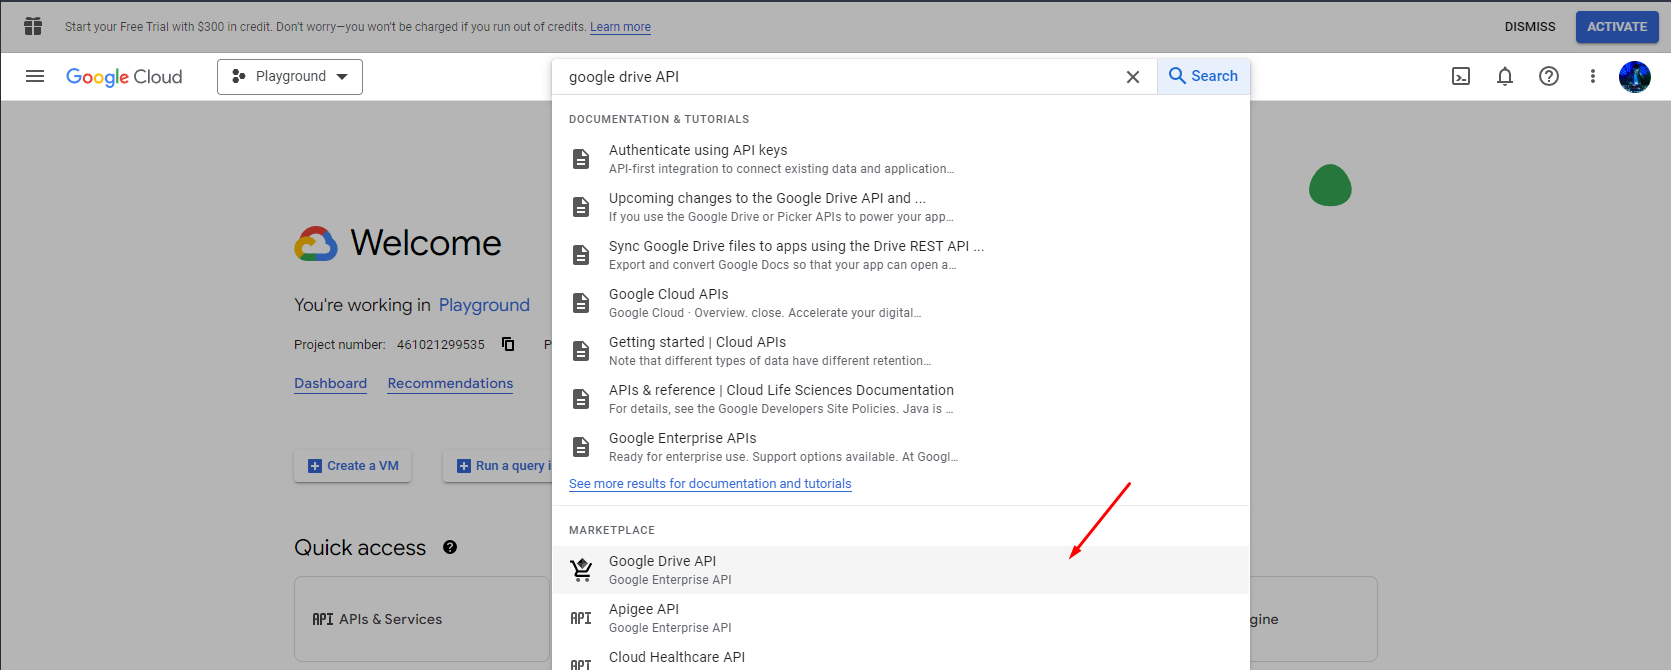
After the project is created, select your project from the Select a project dropdown and then search for Google Drive API on the search bar. Go ahead and enable this API. Repeat this process for Google Sheets API as well.

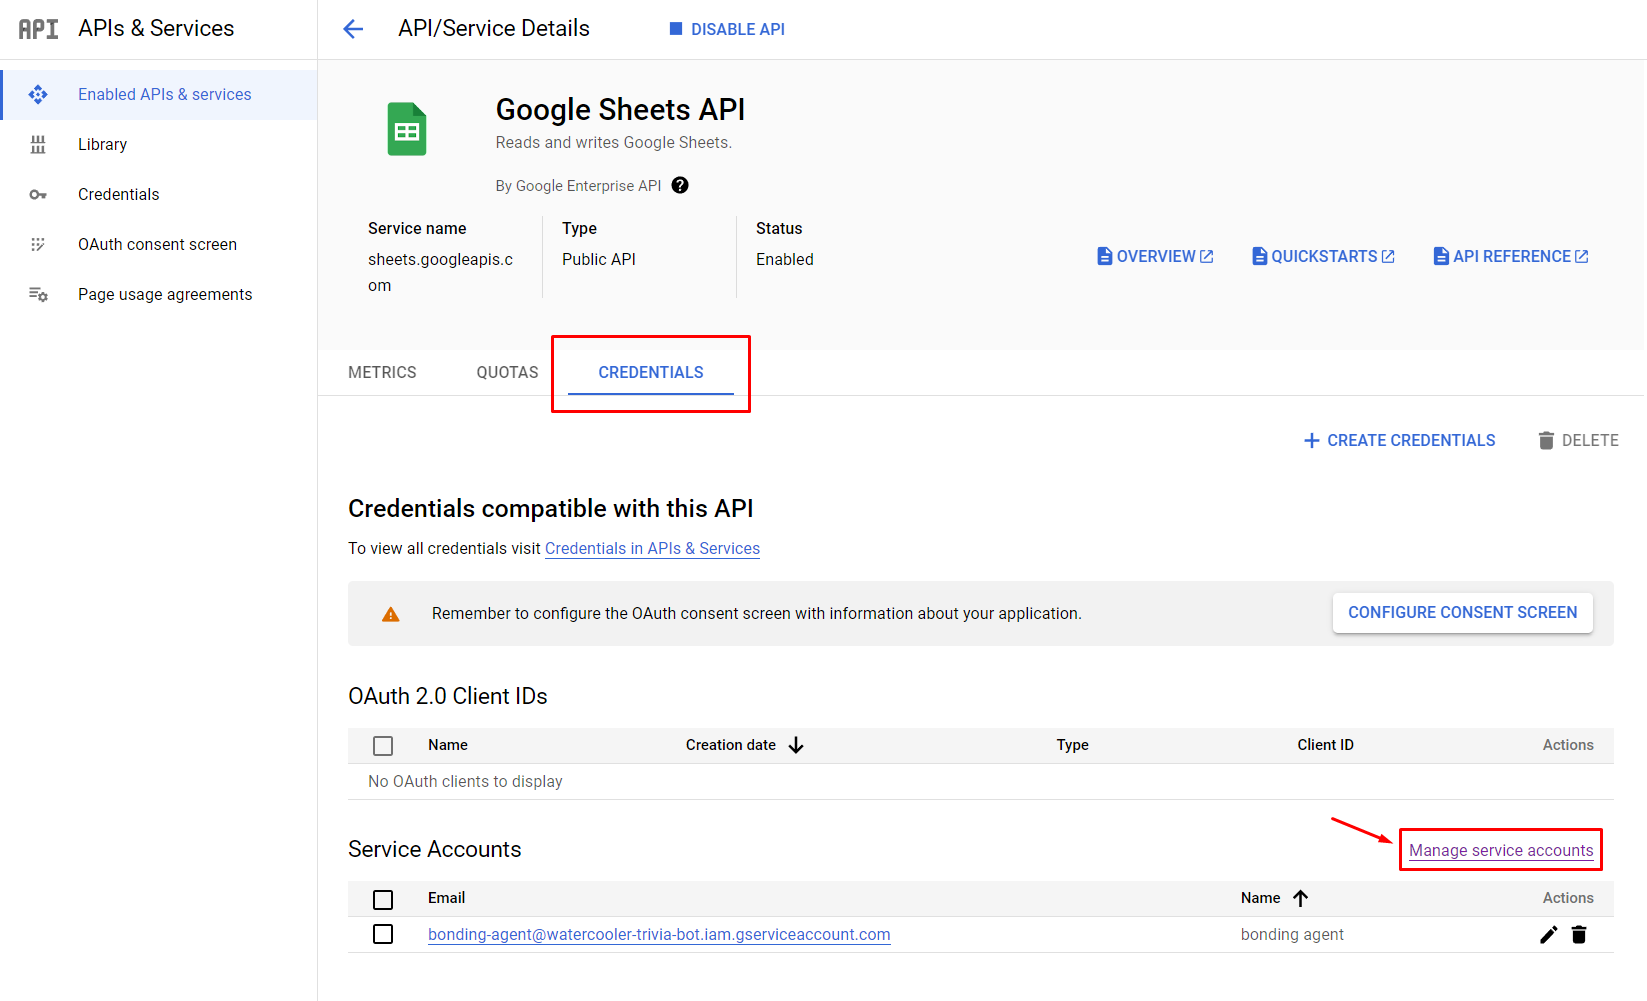
Enter the Google Sheets API dashboard, open the Credentials tab, and click on Manage service accounts
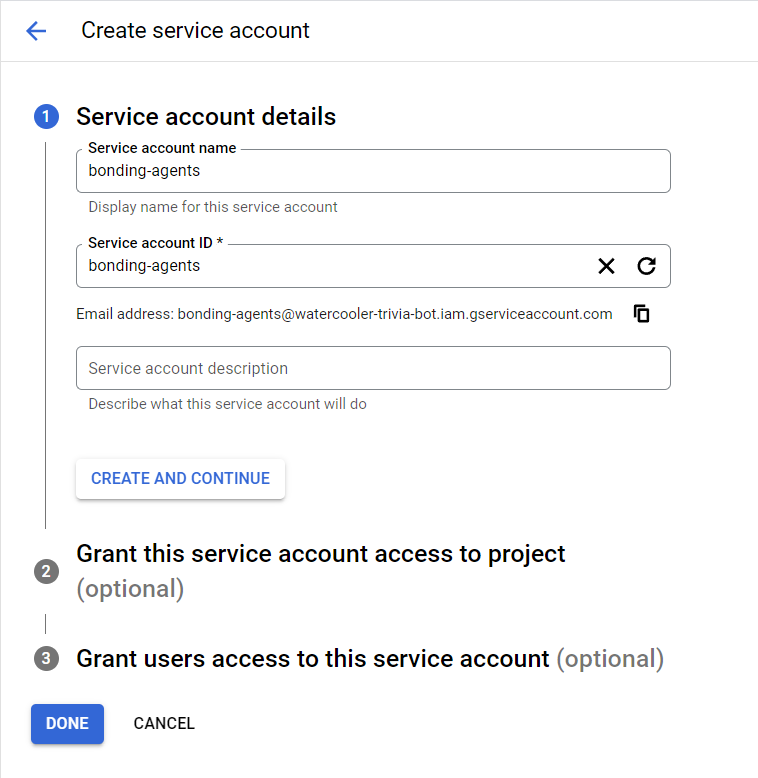
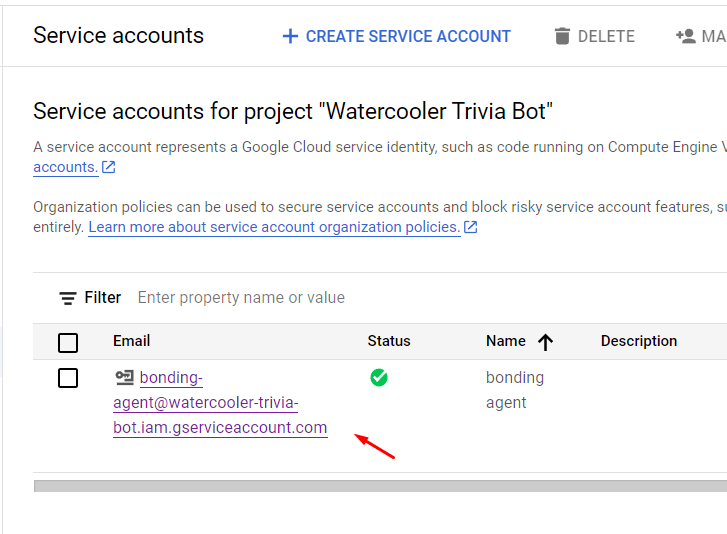
Click Create Service Account, then give this service account any name you want. Copy the email address shown (you'll need this for Step 5), then click Create and Continue. You can skip all other optional configurations.
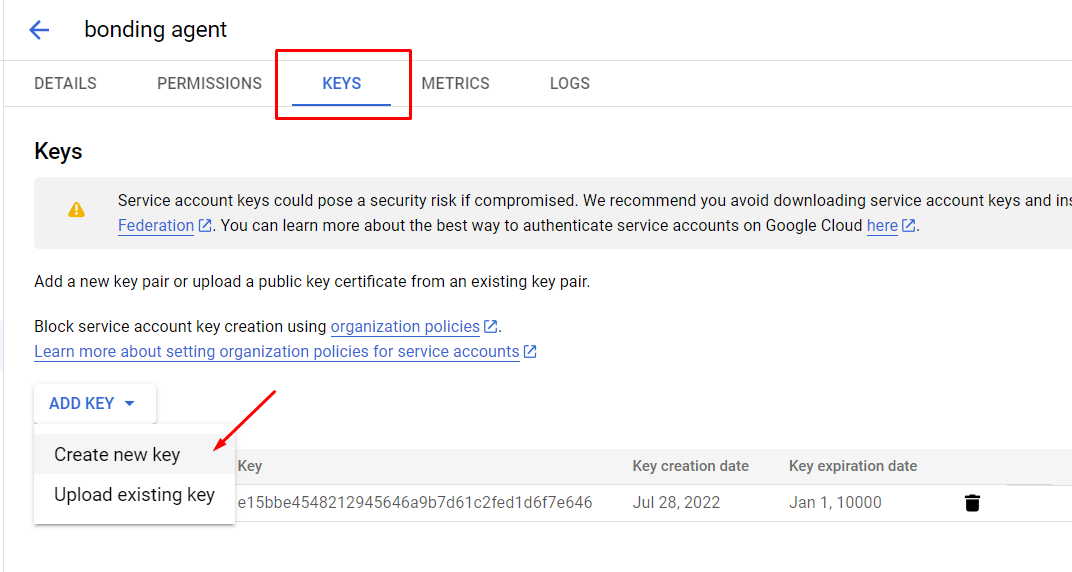
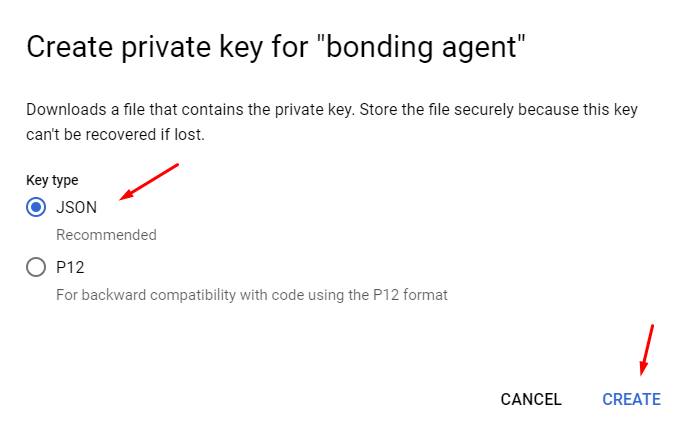
Click on your newly created service account, then create a new JSON key for it. Store this JSON key somewhere in your computer. We'll need it later!
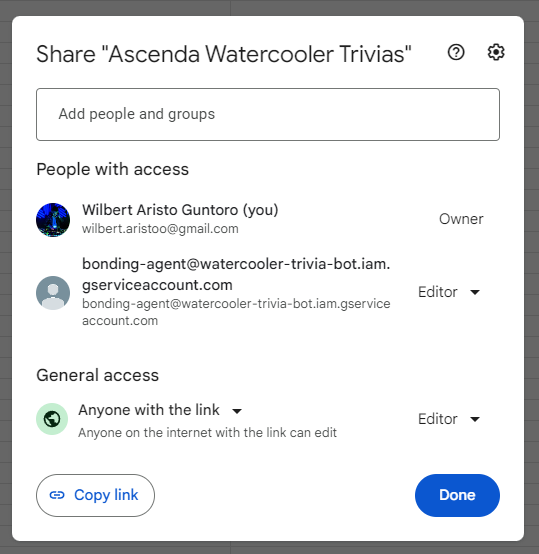
Make a copy of this spreadsheet, then give it a title (I'm calling mine as Ascenda Watercooler Trivias in this example). Next, open the Share settings. Paste the service account email that you copied earlier into the Add people and groups field. Make sure you give this email the Editor role, and then click Send.
Congrats! Your service account should now be able to access this spreadsheet :)
Slack Bot
Now, let's create a Slack bot that will post watercooler questions to a specific Slack channel.
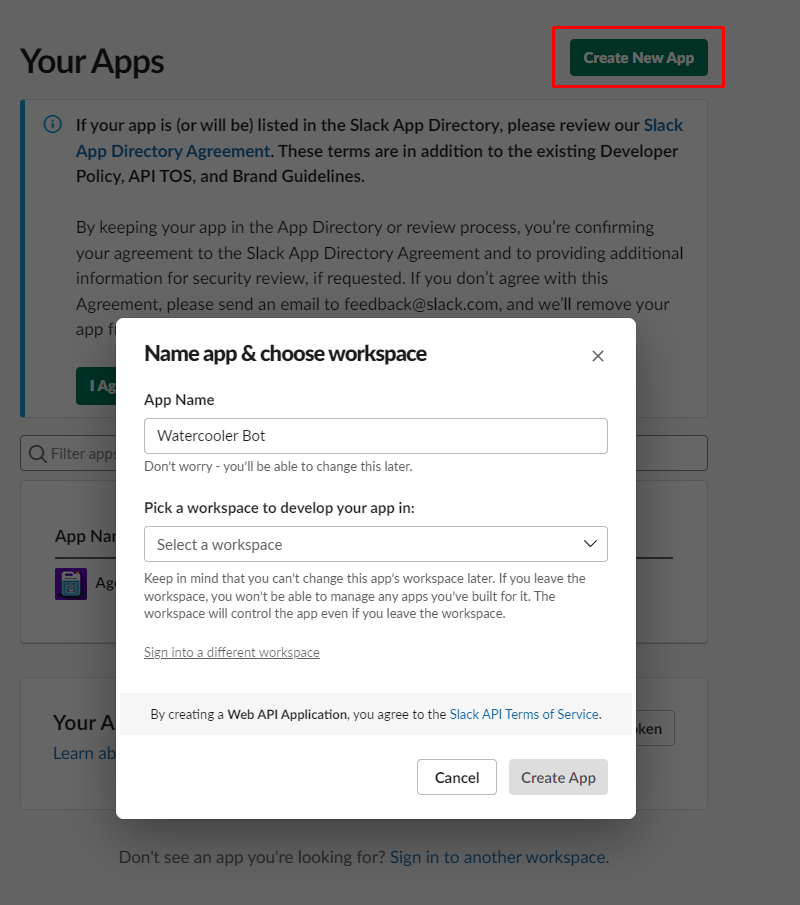
Make sure you have signed into Slack and head over to https://api.slack.com/apps. Click on Create New App, select From scratch and fill in your application name as well as workspace. Then, click Create App
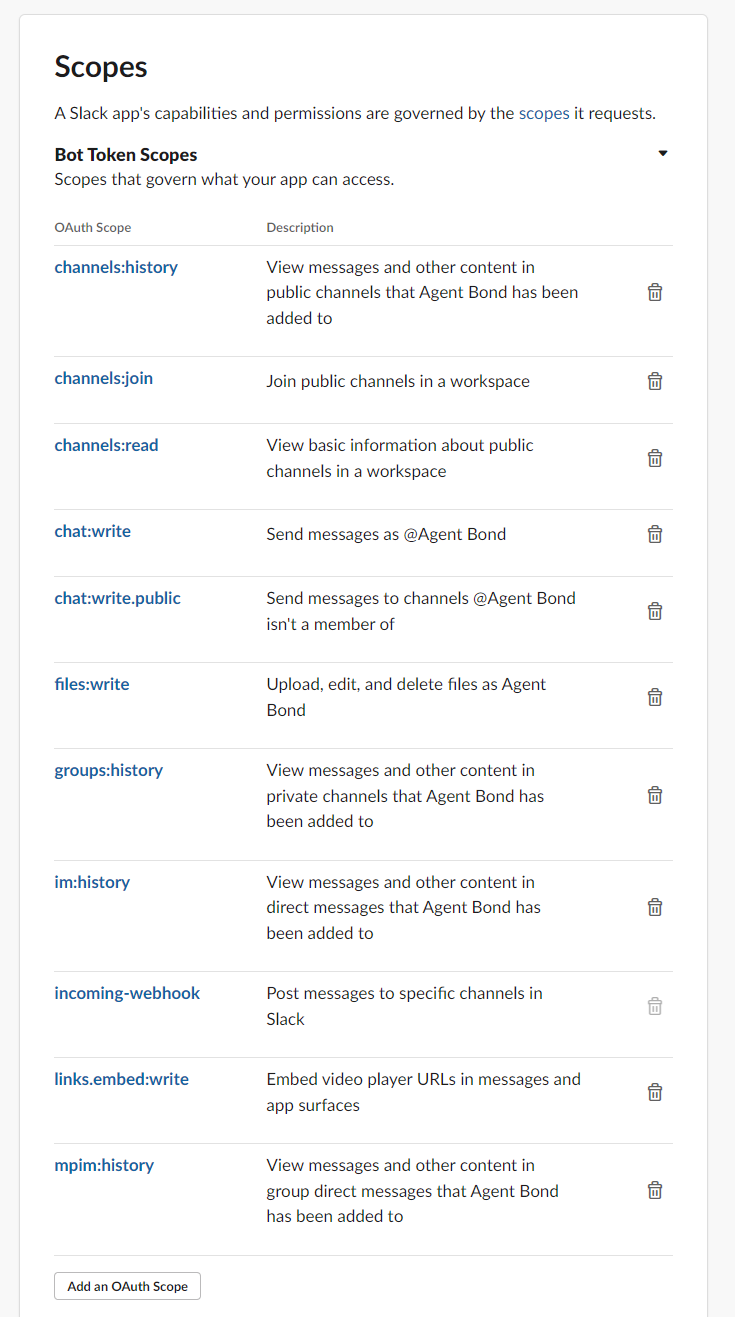
We need to give our new app the necessary permissions to access & write messages to Slack channels. Go to OAuth & Permissions tab on the left, scroll down to the Scopes section, and click Add an OAuth Scope. Search and select chat:write. You can read the descriptions to see what each permission does. Now, repeat this process until you have all these permissions:
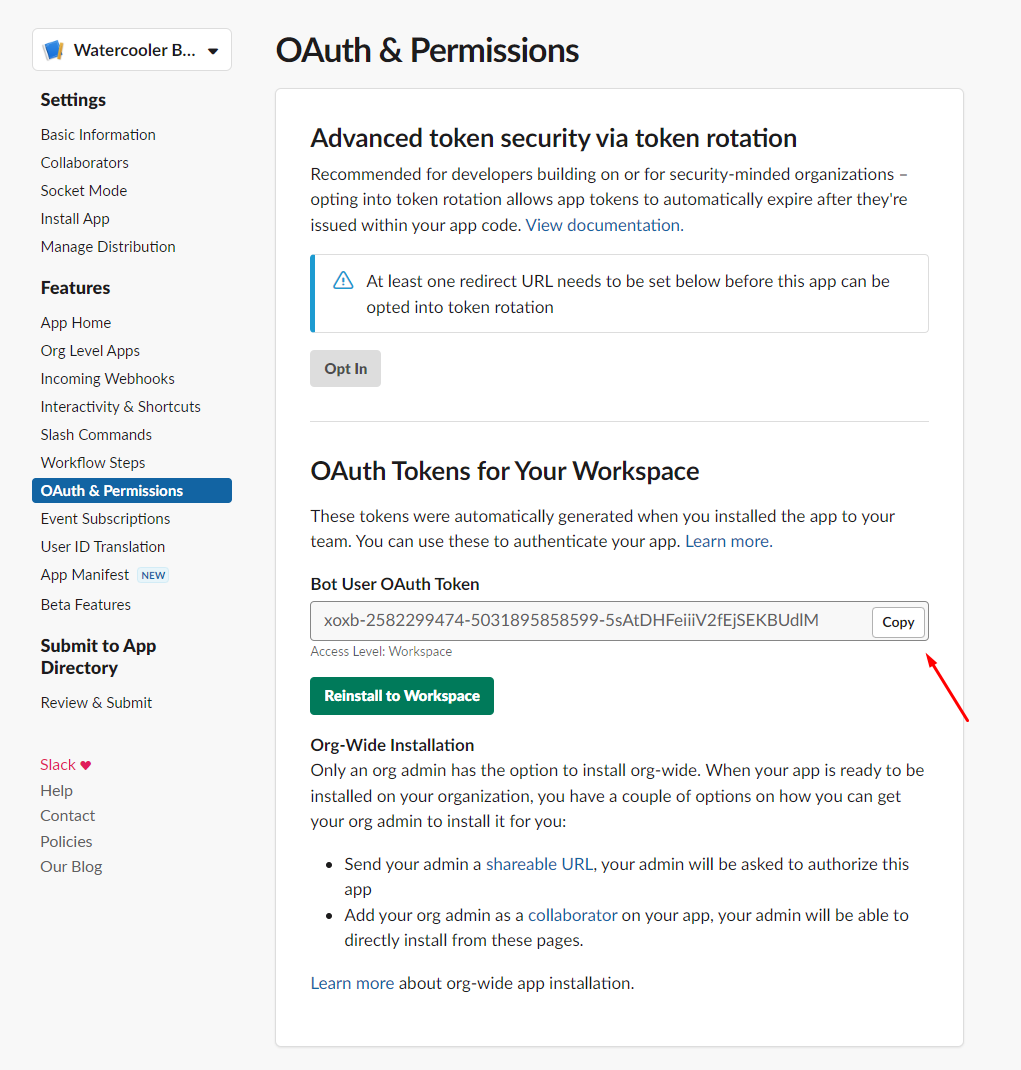
Next, let's install your new app in your workspace. Scroll up and you should see Install to Workspace. Click on it and then click Allow if prompted for confirmation.
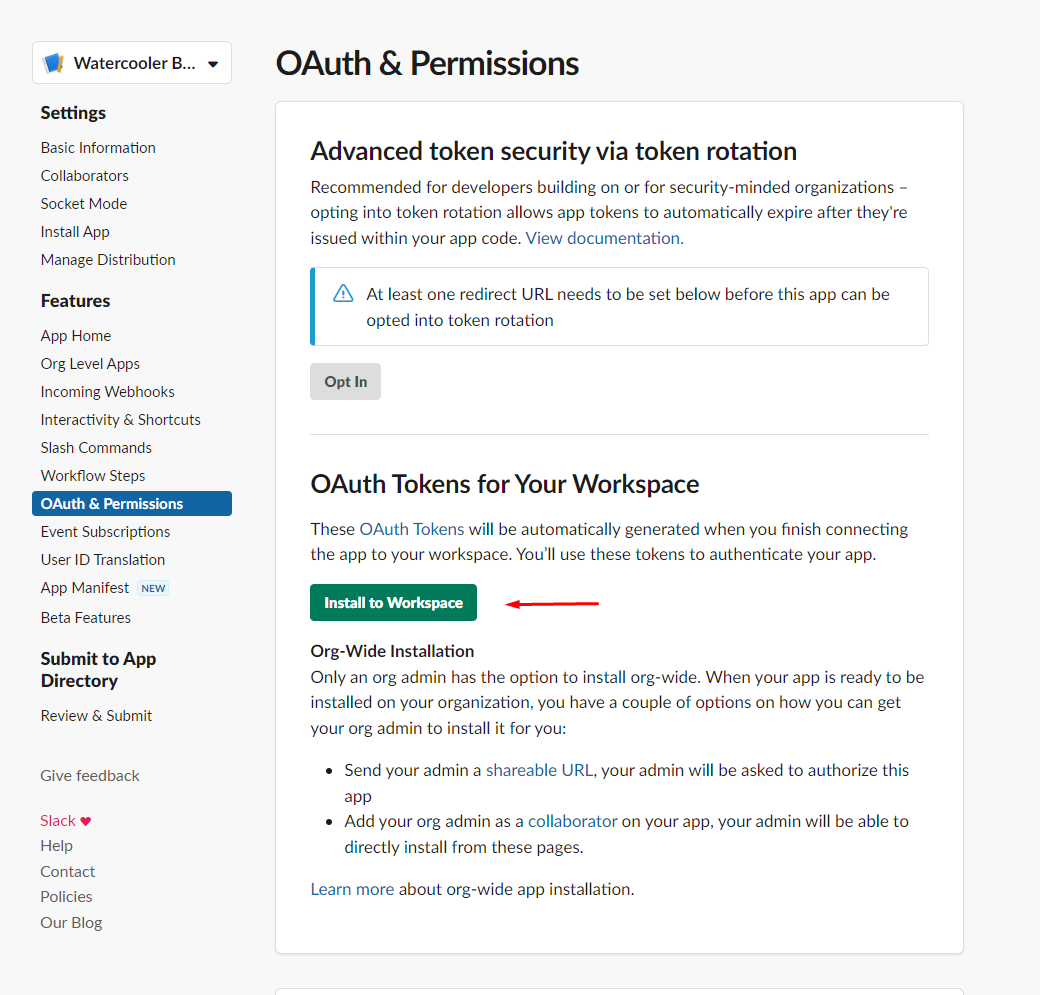
Congrats! Your custom application is now on Slack :) You should see an OAuth token available upon successful installation. Take note of this token because we will need it later!
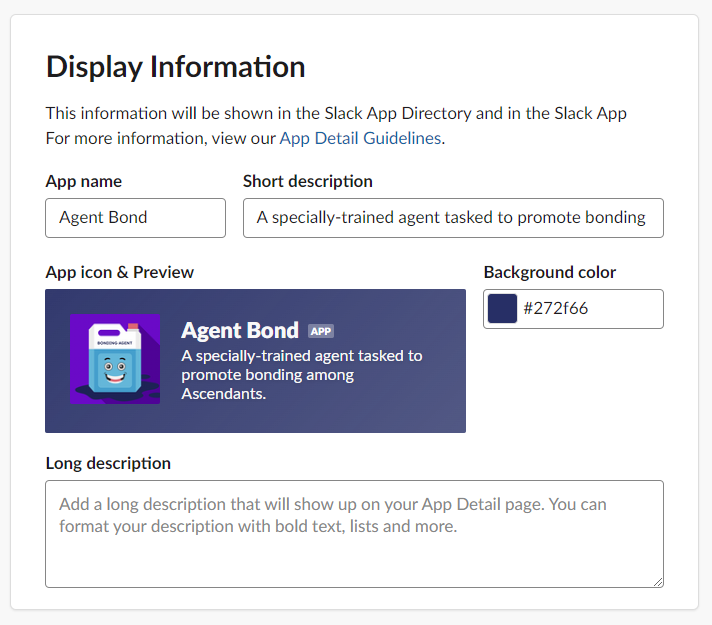
All work and no play makes your Slack bot a dull boy. Customize your Slack bot in Basic Information tab under Display Information section to make it look better :)
Script
I have created a template script at https://github.com/wilbertaristo/watercooler-bot. You can clone the repository and follow the setup below:
Environment File
After cloning the repository, rename the .env.sample file into .env file. We will need to alter a few variables in this .env file:
For AUTH_TOKEN, simply copy over the OAuth token that you have created in Step 4 of Slack Bot section above.
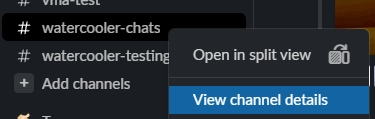
For WATERCOOLER_PRODUCTION_CHANNEL_ID, get your target Slack channel's ID and paste it here. To get your slack channel's ID, right-click on the channel and click View channel details, then scroll down to see the channel ID.
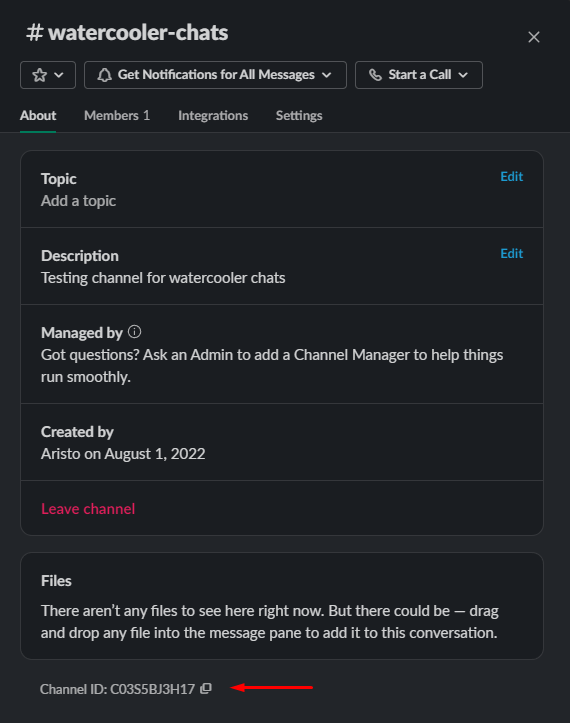
For WATERCOOLER_DEV_CHANNEL_ID, you can create a separate Slack channel for your testing purposes (e.g. call it #watercooler-testing), then repeat the step above to get this testing channel's ID.
For GOOGLE_SECRETS, copy over the content of the JSON key file that you saved in Step 4 of Google Cloud Console section.
In the end, your .env file should look something like this:
API_URL=https://slack.com/api/chat.postMessage
DELETE_MESSAGE_API_URL=https://slack.com/api/chat.delete
CONVERSATIONS_HISTORY_API_URL=https://slack.com/api/conversations.history
AUTH_TOKEN=xoxb-2582299474-5031895858599-ezv3C7YI9SXVWae2M7puqZsT
WATERCOOLER_DEV_CHANNEL_ID=C02S9BJ3H15
WATERCOOLER_PRODUCTION_CHANNEL_ID=C03S5BJ3H17
GOOGLE_SECRETS={"type": "...","project_id": "...","private_key_id": "...","private_key": "....","client_id": "...","auth_uri": "...","auth_provider_x509_cert_url": "...","client_x509_cert_url": "..."}
Spreadsheet setup
Open the Google spreadsheet that you created in Step 5 of Google Cloud Console section. Make sure you already have given it a title of your own. The spreadsheet comes pre-loaded with 10 sample questions in the Pending Bot Pickup sheet. You may choose to add more questions and their corresponding GIF attachments to this sheet.
Open post_question.py file in the repository, then modify this line of code on line 22
spreadsheet = service_account.open("Ascenda Watercooler Trivias")
into the title that you have chosen. For example, if your spreadsheet title is My Awesome Watercooler Questions, your line should look like
spreadsheet = service_account.open("My Awesome Watercooler Questions")
Keep in mind that if you change the sheet names in your spreadsheet, you will also need to change lines 24 and 25 of the code:
pending_ws = spreadsheet.worksheet("Pending Bot Pickup")
done_ws = spreadsheet.worksheet("Done (Already asked by Bot)")
Otherwise, if you didn't change any of the sheet names, you can keep these lines as is.
Execution
Open your terminal and cd into the repository's root. We will now install the required python packages to execute this script. I would recommend creating a virtual environment (I use venv) before proceeding. If you have created a virtual environment, activate the environment and then run pip install -r requirements.txt in the terminal. All the necessary packages should be installed once this command runs to completion. Finally, to execute the script, you can simply run python post_question.py. If you have done everything correctly, you should see a watercooler question posted by your custom Slack bot on your watercooler Slack channel!
Hosting & Automation
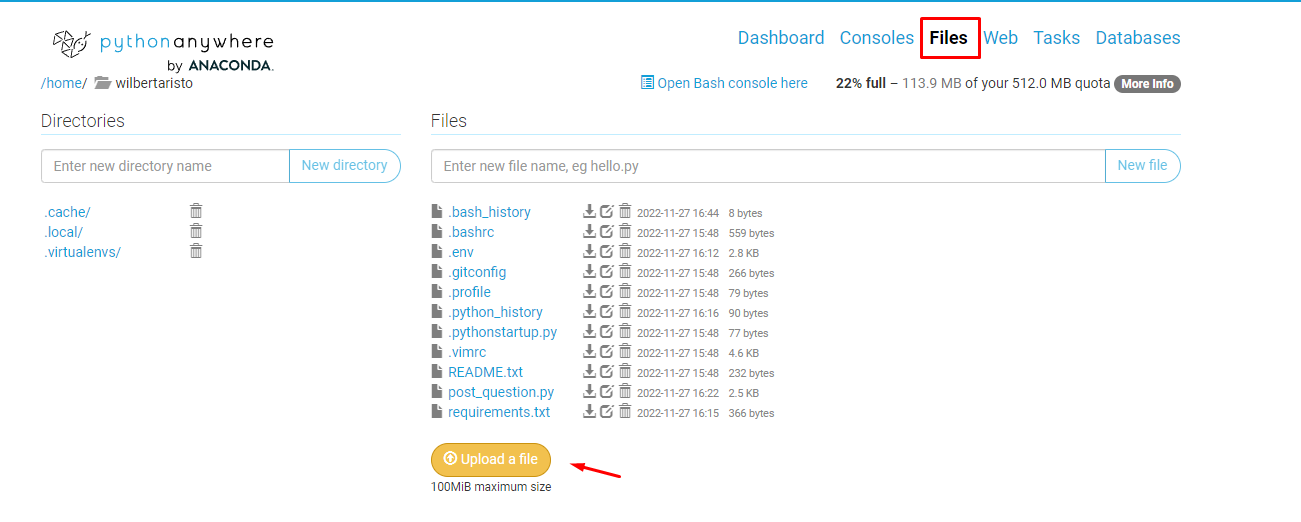
Next, we want to find a way to automate the execution of this script on the cloud without you having to manually execute it on your local console every day. I use python anywhere for this. Simply create a free account there, and upload all the files from your local repository into the cloud platform through the Files tab.
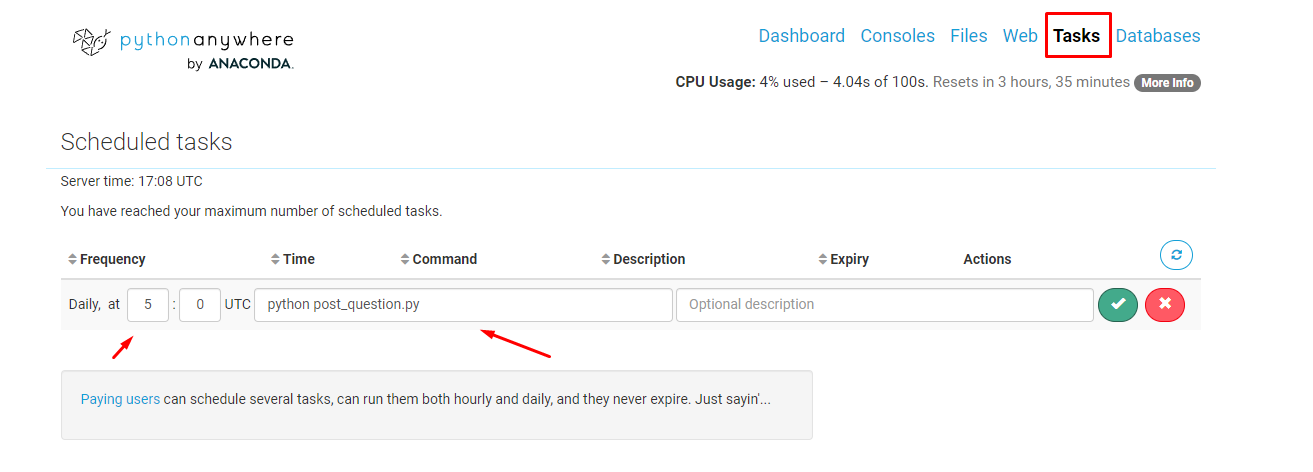
Next, you can go to the Tasks tab and create a new task. Specify the time at which you want to execute the script daily and don't forget to enter python post_question.py under the Command field
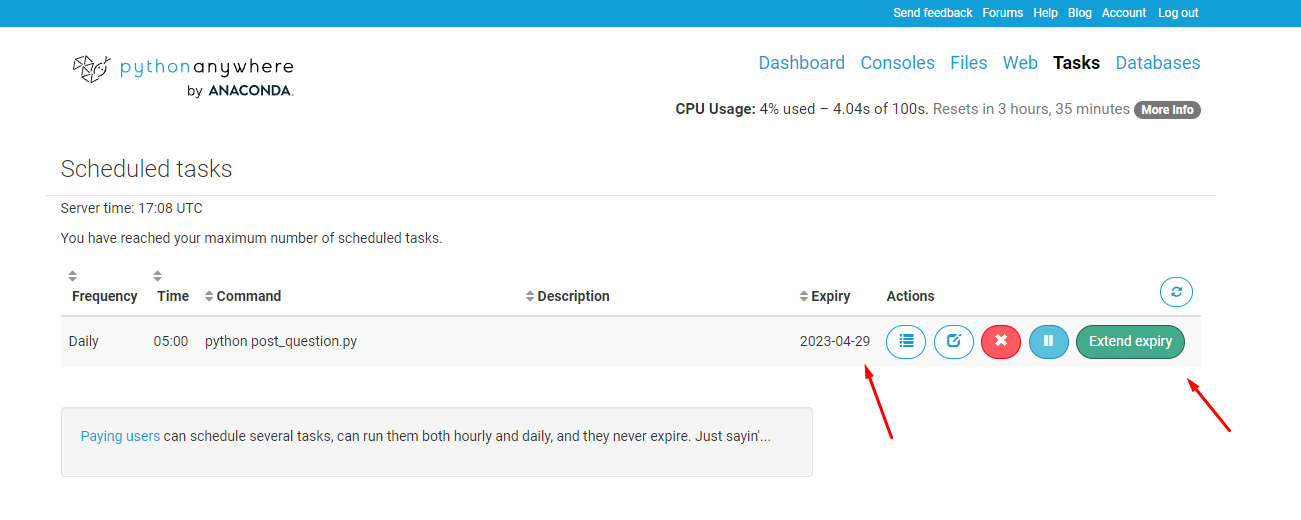
Tada! Your watercooler chatbot should now be running automatically every day! One caveat though, since we're using python anywhere free tier, your task will automatically expire in about a month. To extend your expiry, you will need to press Extend expiry before the expiry date. It's quite annoying, but hey, beggars can't be choosers (heh). Besides, I prefer clicking this button once every 3 weeks rather than executing the script through my console every day xD
Conclusion
And there you have it folks! A homemade watercooler chat bot made by integrating Google Sheets API, Slacks API, and some Python magic. I hope you had much fun trying this out just the way I did when I first built it :)
Feel free to reach out to me through the GitHub repo or LinkedIn if you have any further questions. Till next time!
Appendix
Script Explanations
The methods and code under post_question.py are mostly self-explanatory:
get_random_qn() will get a random question from your Pending Bot Pickup sheet in your Google spreadsheet.
send_attachment(channel_id, text, image_url) will send the text (question) along with GIF attachment to the specified channel ID.
send_message(channel_id, text) will send the text to the specified channel ID (no attachments)
send_trivia() is a simple scheduler function that will return a boolean depending on the day of the week. I've hardcoded this method such that it will only return true if the method is called on Monday, Wednesday, and Friday. This is because I want my watercooler bot to only send questions on those days.
The execution script utilizes these 4 methods and are explained further through comments in the file itself.
Alternatives
There is already an existing service for watercooler chats called Donut, but we decided not to use Donut because:
Donut has a free tier but it comes with a very limited set of topics and can only accommodate a maximum of 24 people in the watercooler chat channel. We wanted to implement this as a whole-company initiative so the 24-pax ceiling was a major deal-breaker. Furthermore, the next cheapest price tier is 50 USD/month, which is quite steep.
Donut can only ask generic questions from the set of topics provided. We felt that asking company-related questions or even custom questions created by our employees would be much more personal and could promote bonding better.